Tuesday, August 16, 2016

Toddler-Friendly Loaded Veggie Pesto


There's nothing quite like the bite of a fresh garlic-y, basil-y pesto sauce.  I love the spice of the fresh garlic paired with the fresh taste of basil and olive oil tossed with a favorite pasta.  Basil, however, is not a vegetable...it is an herb.  A delicious, amazing herb that I can chop and put on everything from Thai food to tomatoes to liven up a dish.

My daughter is a fan of pasta, to put it simply.  I can give her pasta in any form and she will devour it happily.  I try and come up with sauces I can throw on pasta because I know how popular pasta is with toddlers.  It's fun to eat, comes in a variety of shapes, and it's just plain delicious.

This veggie pesto is AMAZING.  It is loaded with greens, sticks beautifully to pasta so you know your toddler is getting globs of vegetables in every bite, and most importantly, it is so delicious!!  You can easily double the quantities in this recipe and freeze the pesto for future use.  I love this sauce on everything, but it's especially good as a spread on homemade pizza!!


Ingredients:

1 lb of asparagus spears
3-4 large handfuls of fresh baby spinach
3 cloves of garlic
1 cup of freshly grated Parmesan cheese
1/4 cup of olive oil or more, to taste
Juice of 1/2 or more lemon, to taste
1 cup Pine nuts or slivered almonds (optional, but I think it adds a lovely flavor)
20 or so fresh basil leaves
salt and pepper to taste


Directions:

Set a large pot of water to boil.  Cut the ends off the asparagus.  You can put them in long or cut them into smaller pieces.  Boil for 4-5 minutes

While the asparagus is boiling, get out a small skillet to toast your pine nuts.  Add a tsp of olive oil and set the pan on medium low heat.  Add your nuts and toast them until they are a warm, golden color.  Don't burn them.  Just monitor your heat on the pan and reduce it if you notice they are browning too quickly.

Once your asparagus is cooked, take them out and put them in your large food processor.  Add the rest of the ingredients to the chopper as well.


Blend well, adding more olive oil if desired to reach the consistency you like.  Taste your pesto and add salt and pepper according to taste.  I prefer my pesto to be a slightly thicker consistency only because it's easier for the pasta to grab the sauce and therefore my child eats more vegetables.  Win-win!


You can easily make this dairy-free by omitting the Parmesan, or nut-free by taking out the pine nuts or almonds.  The pesto will still be delicious.  Toss with your favorite pasta and watch as your toddler demands more (vegetables)!



Wednesday, August 3, 2016

Toddler-Friendly BBQ Chicken Quinoa Bake


It was one of those evenings....I had no clue what I could throw together for dinner and had a limited amount of time to come up with something creative.  After an inventory of the fridge and pantry, my eyeballs kept going to the jar of Sweet Baby Ray's BBQ sauce I have stocked up.  Being VERY pregnant, I really wanted to guzzle down the sauce itself but thought perhaps I could come up with something the whole family may enjoy.  I didn't think the hubs or toddler would be as excited about eating a condiment for dinner as I was.  I had quinoa (always, I always have quinoa), chicken, some kale (again, always with the kale), and of course my BBQ sauce and a ready supply of cheese.  Enter: BBQ chicken quinoa bake! This recipe turned out SOOOOO good and it was so incredibly satisfying and filling and most importantly, my toddler loved it!

Ingredients:

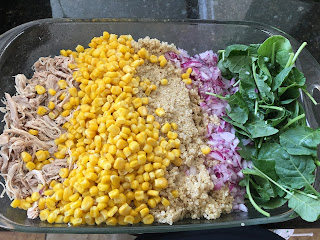
3 cups cooked quinoa
2 cups of corn, cooked from frozen bag
1 cup of diced red onion
2-2.5 cups of shredded chicken.  You can easily use rotisserie chicken but I had some chicken breasts on hand that I threw in my pressure cooker for 15 mins and voila! Shredded chicken.
Extra dose of veggies is optional but I threw in some kale and spinach because...why not??
2 cups of shredded Colby cheese or Sharp cheddar
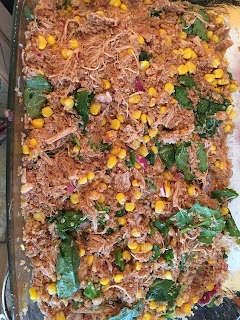
2 cups of BBQ sauce of your choice, but I love Sweet Baby Ray's!


Directions:

Preheat your oven to 375 degrees.

Spray some non stick spray in your casserole dish

Assemble your chicken, corn, quinoa, diced onion, and kale in the dish. 


Add your BBQ sauce and 1 cup of cheese.  Mix well.  I used my hands because I love getting my hands messy while cooking!!


Add your remaining one cup of cheese on top


Pop it in the oven for around 15 minutes


Drizzle some more BBQ sauce on top before serving.  Cut into squares and dive in!!!


Tuesday, July 19, 2016

Toddler-Friendly "Not Your Fish Fry" Fish Sticks


Let's face it, in the South, there's nothing quite like a deep fried piece of fish to get a party started.  Not the healthiest meal, but then again...it's fried-fish-deliciousness.  I have been trying to perfect an oven baked version that still somehow remains crispy, and it's been tough my friends--until now.  I think I have the combo and cooking method pretty much down for some oven fried fish goodness that your toddler and large toddler (husbands, etc) will love!

I know you can buy a big bag of frozen fish sticks from the supermarket and call it a day.  But take a look at the ingredients on most of those bags and you'll realize how many preservatives and extras have to be loaded into those fish sticks to get them to hold together.  Then, look at these ingredients:

Ingredients:

2 lbs Alaskan Cod - Sliced into 1 inch thick and 2 inch wide fish stick size pieces

2 cups of whole wheat flour (or regular flour)

2 cups of Panko bread crumbs

2 eggs

3-4 tsp Old Bay seasoning

1 tsp Parsley flakes

1 tsp Paprika

Salt and Pepper

Juice of 2 lemons

2 tbsp of Dijon mustard

Cooking Spray


Directions:

Preheat your oven to 450 degrees and line a cookie sheet with foil.  I HIGHLY recommend using a nonstick cooling rack for this recipe.  I placed the cooling rack over the cookie sheet so that all sides of the fish sticks could be equally heated and crispy.  Otherwise, you run the risk of having one side of the fish sticks mushy and getting stuck to the cookie sheet.

Generously spray your cooling rack with non stick spray.


Put your flour in one plate.  Combine the Old Bay Seasoning, parsley flakes, paprika and Panko crumbs into a separate plate.  Combine your eggs, lemon juice, and Dijon mustard in a third large, shallow bowl.  Dry your fish as best you can with some paper towel and place on a fourth plate.

Set up your breading station in this order: Fish sticks, flour, egg wash, and Panko, with the Panko being closest to the cookie sheet.  In my setup below, my cookie sheet is on the left out of frame, and the fish sticks are farthest from the cookie sheet.


Dip each fish stick into the flour and dust off the excess.  Dip into the egg wash, letting excess drip off before finally coating it into the Panko.  Place each stick onto your rack and repeat until you run out of space on the rack.  You may need to do a second batch of fish sticks depending on how many you made.

Once all the fish sticks are on the rack, stick them in the oven for around 13-14 minutes.  They should be golden and crispy and flake easily with a fork.  As a reminder, the internal temperature of the fish should be at least 145 degrees.


Serve with some roasted veggies or a salad on the side.  I made a little cocktail sauce for my husband and I mixed 3 parts ketchup with 1 part horseradish.  YUM!  My toddler loved these fish sticks.  If you have picky fish eaters in the house, definitely give these a try since the cod is such a mild, non- fishy-tasting fish!  Enjoy!


Tuesday, July 12, 2016

Toddler-Friendly Chicken, Black Bean, and Spinach Quesadillas


Living in Texas, there are countless Tex-Mex dining options and absolutely everyone has a favorite joint. The problem with eating out for Tex-Mex is this: chips and queso.  I don't know about ya'll, but when a server puts that plastic basket of golden and warm tortilla chips in front of me, I am a goner.  A margarita (well, not now because I'm pregnant), a basket of chips and queso, a plate of greasy enchiladas, and 7 bajillion calories later....well you get the idea.  Unless you're incredibly disciplined and are one of those "I'll just have the grilled fish tacos on corn tortillas and a skinny margarita" person, you're likely to consume an absurd amount of calories while dining out for Tex-Mex. Don't get me wrong, I am all about the occasional indulgence.  However, if you're having a craving and want to feed your family a much healthier option, try these quesadillas.  These are so versatile, super toddler-friendly, and are SO easy to whip up.  Loaded with fiber, protein, and of course veggies, you will feel great about serving this meal to your family!

I used my pressure cooker to make the chicken mixture, but you can also use your slow cooker.

Ingredients:

Large/Burrito size flour tortillas
1 15 oz can of black beans - Drained and rinsed
2 lbs of chicken thighs or breasts
3 tsp of ground cumin
1 16 oz jar of mild salsa of your choice - I used H-E-B brand organic Salsa
1 cup of water
10 oz bag of frozen chopped spinach
Mexican cheese blend - shredded
Unsalted butter or canola oil
Salt and pepper
Optional: Avocado and sour cream


Set a large pot or your pressure cooker to medium high heat then add 2 tsp of oil

** I was terrified of my pressure cooker and let that baby sit in my cupboard for five years.   Then I saw an 8 year old use a pressure cooker on MasterChef Junior without flinching.  The next day, I learned how to use my pressure cooker properly and have never looked back. Seriously guys, the pressure cooker is the most amazing cooking tool ever.  

Place the chicken in the pot/pressure cooker and add some salt and pepper.  Sear the chicken on each side for 2-3 minutes, allowing for the juices to seal


At this point, if you're using a slow cooker, transfer the chicken to the slow cooker.  Add the black beans, the salsa, the cumin, 1 cup of water, 1 tsp of salt, and a bit of pepper. Set on low for 8 hours if using a slow cooker.

If you're using a pressure cooker, just add the same ingredients as above to the pot.  Set the pressure cooker on high heat until you've achieved high pressure and get the steam/whistle, then lower your pressure cooker's heat, but still retain relatively high pressure (don't release the pressure yet).  You may need to set it a couple of notches down from high heat, depending on your stove.


After 15 minutes (or 8 hours for the slow cooker), remove the pressure cooker from the heat and let the pressure drop naturally.  Some pressure cookers have a quick release valve which I've used when I am pressed for time.  Once the pressure has been completely released, open the lid.  You should be able to easily shred the chicken with two forks.  Yes, after 15 minutes in the pressure cooker ya'll!  I'm telling you, this is truly a fantastic tool!


Add your cooked spinach to the mixture and stir well.


Taste the mixture and add salt and/ or pepper as needed.

Set up your quesadilla-making station:  Flour tortillas, cheese, butter or canola oil, and chicken mixture.

Get a large skillet or pan heated up on medium high heat.  Add a pat of butter or 1/2 tsp of canola oil. I feel like olive oil has a bit too much of a noticeable flavor and can alter the taste of this dish so I opted for canola oil for my husband and butter for my toddler.

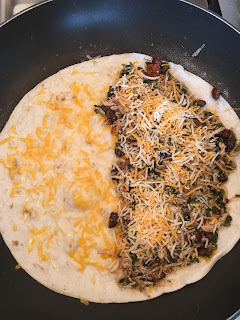
Once the oil or butter shimmers, add your tortilla, and sprinkle some cheese on it.


Spoon a few tablespoons of your chicken mixture to one half of the tortilla.  Throw some more cheese on top.


Once you see the tortilla starting to bubble up a bit and the cheese melting, (2 minutes or so), fold the tortilla over.  It should have some nice golden/brown spots on it.


You can press down a bit to really get that stuffing all up in there.  Remove from heat, cut into wedges, and serve with some diced avocado and sour cream.  You can use the chicken mixture on salads, a burrito bowl over rice, or just eat it as-is.  This mixture is also super freezer-friendly!


Tuesday, July 5, 2016

Toddler-Friendly "Loaded Veggie Bolognese"


Pasta - the ultimate comfort food! And as it happens, one of my toddler's (and husband's) favorite meals.  Pasta is also one of those things that most pantries have a ready supply of and it's a quick meal when there's no other option.  But what about the sauce?? Sure I could throw some cheese on the noodles and call it a day, but wouldn't it be nice to have a freezer stash of made-from-scratch, loaded with veggies, brimming with meaty goodness sauce on hand?  Enter "Loaded Veggie Bolognese" as your healthy, freezable alternative to store bought jar sauces.  Make a large batch of this sauce to serve for a few dinners and then freeze the rest for those emergency days when you're running late to make dinner, don't want to eat out, or are exhausted from wrestling your toddler out of the swimming pool and into dry clothes.  The toddler who now happens to be screaming at you for dinner.  Seriously, why do they always act like they've been starved for days when you're 10 seconds late serving dinner??

Anyway, this sauce can be made using a slow cooker or regular large Dutch oven or any other cauldron-size pot you may have on hand.  Your picky veggie eaters will not be able to see/taste/feel/pick out any of the hidden vegetables in this dish.  If they do, color me impressed.

Ingredients:

2 lbs lean ground beef or turkey - I used 96% lean beef for this recipe
2 28 oz cans of crushed tomatoes
6 cloves of garlic
One large white onion
2 medium size zucchini - peeled
3 large carrots - peeled
2 cups of chopped baby Bella or Cremini mushrooms (optional, but I think it adds a nice flavor)
3 tbsp of chopped fresh oregano
Fresh parsley
Salt and pepper
1-2 tsp of sugar


Directions:

Bring large pot or Dutch oven to medium high heat, add your ground beef, breaking up with a wooden spoon as it cooks.


Meanwhile, peel your zucchini, carrots, onion, and garlic.  Get out your whopper chopper (as I call mine) and add all the veggies to the chopper, including mushrooms, and give it a whirl.  It should resemble this:


Once your ground beef is browned, remove the beef onto a plate.  This is important in order to prevent drying of the meat, especially if you're using lean meat.  You will add it back in later.


You should have some fat from the beef rendered in the pot so just use that to cook the veggies with.  Add the vegetables to your pot and cook on medium high heat for 15 minutes or so.  The veggies will be watery from the zucchini and mushrooms so you want to dry it out a bit via cooking or your sauce will be too watery.


After 15 minutes, add your two cans of crushed tomatoes, beef, chopped oregano, sugar, and a GENEROUS amount (at least 2 tablespoons) of salt.  This is a really big batch of pasta sauce we are making and since we didn't use any pre-made sauces, there will be no added salt or sugar.


Mix well, cover, and reduce heat to a low simmer for 1-2 hours.  The longer the sauce cooks, the tastier it becomes with all the flavors coming together beautifully.  After an hour, check the sauce and add more salt if needed.  It will likely need it!


When ready to serve, chop some fresh basil or parsley and top with freshly-grated Parmesan.  Serve over your favorite pasta! I've found bowtie to be really easy for toddlers to grasp and that particular pasta grabs sauces really well too.  Freeze the leftover sauce in airtight plastic containers to reheat later!

Wednesday, June 29, 2016

Toddler-Friendly Broccoli and Cheese Quinoa Cups


Besides trying figuring out how to actually pronounce "Keen-Wah"...or " "Kee- NO - A" as my husband calls it (emphasis on the NO) many people just don't know how to cook the darn thing or what to do with it.  Health food snobs have been touting the benefits of this ancient grain for years and I am always on the hunt for new ways to make quinoa more interesting.

I've been feeding my toddler quinoa since she was 6 months old.  Instead of rice cereal, she had quinoa cereal.  And once she was a bit older (maybe 7-8 months) I started mixing in plain, full fat Greek yogurt and some organic unsweetened apple sauce into the quinoa.

Now that my toddler is, well, a toddler, and demands to eat on her own, I have been trying to find ways to make grains easier for her to harpoon with a fork or eat with her hands.  Enter baked quinoa cups!!  My dogs are pretty upset about this development, their greatest joy in life is serving as "toddler meal clean up crew". These cups hold together pretty well, and are 100000% times easier to eat for my toddler than just plain cooked quinoa, PLUS they are loaded with veggies.  There are countless combos that you can try with these cups, but I decided to make a batch of broccoli and cheese cups first. Verdict? My toddler demolished them! You could serve these "as-is", or with a side of meat protein depending on your dietary preference.  These can also be frozen if you want to make a giant batch of them!

Broccoli and Cheese Quinoa Cups


Ingredients:

2 cups cooked quinoa (recipe to follow)
2.5 cups chicken stock or vegetable stock
1/2 large white onion or 1 small onion
10 oz broccoli florets - cooked, steamed, etc
2 large eggs
2 cups Sharp cheddar cheese or any shredded cheese of your choice
2 tsp dried oregano
2 tsp paprika
Salt (pinch) and pepper (1-2 tsp)

Directions:

Preheat your oven to 350 and line a muffin pan with muffin liners or just spray it generously with non stick cooking spray.

Begin with your quinoa.  I know what the directions on the quinoa box say: it's a 2:1 ratio of liquid to quinoa and let it simmer for 15 mins and done.  WRONG!!!.  This always results in mushy/watery quinoa and it drives me bonkers.  Try it my way:

Bring 1.25 cups of chicken stock or liquid of your choice to a boil.  Add 1 cup of dried quinoa to the boiling liquid and stir.  Cover and place on low simmer (not totally on low) for around 12-14 minutes. Remove from heat and fluff quinoa with a fork.  This should yield perfect, non-mushy quinoa!!  You can easily double or triple this and freeze the cooked quinoa in Ziploc freezer bags for later use.  Just make sure you use that 1.25:1 liquid-to-quinoa ratio!

While your quinoa is cooking, heat up a non stick skillet with around 1 tsp of olive oil.  Mince your onion and add to the pan, cooking on medium high heat until onion is translucent, around 5 minutes.


Get out a large mixing bowl and add the cooked onions, cooked broccoli, eggs, cheese, oregano, paprika, black pepper, and cooked quinoa.  You can add a pinch of salt, but the chicken stock should have added sufficient salt to the quinoa already so you may not need too much.

I used a potato masher to smash up the cooked broccoli florets into teeny tiny pieces but you can always use a knife to do it!  Mix all the ingredients in your bowl very well.


Portion out the mixture into the muffin pan.  You should have some leftover mixture (unless you have a huge muffin pan!) so just stick the leftovers in the fridge to make another batch tomorrow!


Place in the oven for around 22-25 minutes.  Remove gently with a knife, or if you used muffin liners (smart), removal and clean up should be a pinch!  Let the cups cool a bit before serving.  Enjoy!!


Thursday, May 26, 2016

Toddler-Friendly Butternut Squash Mac and Cheese Bake


Mac and Cheese ya'll.  Mac and CHEESE.  If your kids are anything like my daughter, here's the general reaction to cheesy pasta noodles: Eyes wide, shrieking (good shrieking) and a happy food dance.  The problem with mac and cheese is two fold: it's addictive to kids and it's full of potentially processed chemical cheese.  Even the organic version isn't rip-roaring with nutritional powerhouses. You can do a lot to mac and cheese and still make it super kid and tot-friendly, delicious, and loaded with veggies.  I've done broccoli mac and cheese many times and even my husband, who hates broccoli, grudgingly admits that the combination works really well.  

Butternut squash mac and cheese, however, takes it to a whole new level for me.  I'm a huge fan of pureed butternut squash and love to add it to recipes in creative ways.  I am not, however, a huge fan of roasting and peeling a whole butternut squash.  Which is why I cheat and buy the pre-cut version from my grocery store.... and it is totally worth the extra money so I don't have to hack at the whole squash with a machete and look like a crazy person.  Pureed squash can add a sweeter flavor to the dish, so I really flavor up this meal with herbs, spices, and a couple of different cheeses.  You can make the sauce itself and just serve it over macaroni or you can bake it all together.  This recipe can easily be doubled.  Enjoy!


Ingredients:

1 lb pasta of your choice: elbow macaroni, rotini, penne

2 lbs of cut and peeled butternut squash

3 cloves of garlic, minced

1 cup of minced white onion

5-6 sage leaves

Freshly grated Parmesan - around 1 cup

Shredded Cheddar cheese - around 1 cup 

Salt and Pepper

Olive oil


Directions:

Bring a large pot of salted water to boil.  Before it gets too hot, throw in your cubes of butternut squash.  I learned this the hard way....having a splish splash fun time with boiling water? Nope.

Preheat your oven to 350 degrees.

It should take around 5-7 minutes for your squash to soften but that also depends on the size of the cubes,  Smaller cubes = faster softening.


While the squash is boiling, get out a deep skillet and heat up some olive oil on medium high heat. Saute your onion for 5-7 minutes until translucent and then add your garlic and saute another 1-2 minutes.  

Keep the flame on your onion and garlic on low heat while you puree your butternut squash.  Time- saving tip:  You can keep the same pot you used to boil your squash to boil the pasta.  At this time, get your pasta going according to package directions.  Once your squash is pureed into a smooth sauce, add it to your onion and garlic in the skillet and increase heat to medium.  Slice up your sage leaves as thin as possible and add to your sauce.  Season with salt and pepper, cover, and let is simmer on medium low heat for 10 minutes.  


After 10 minutes, add 1/2 cup of Parmesan cheese to the sauce and mix it well.  Spray a casserole dish with non-stick cooking spray.  Add your cooked pasta to the casserole dish and then pour in your sauce.  Add 1/2 cup of the Cheddar cheese and mix it all really well.  Top off the dish with the remaining 1/2 cup cheddar and 1/2 cup Parmesan.  Bake uncovered for around 15 minutes until the cheese has melted.  You can serve this with some grilled Italian Turkey sausage or just eat it as Meatless Monday dish.  Your toddler will love this and you will love that there are multiple servings of veggies in each portion!!


Wednesday, May 18, 2016

Toddler-Friendly Oven-Baked Veggie Falafel (Chickpea) Patties


I am a big fan of deep-fried, delicious falafel and any sort of Middle Eastern cuisine in general. However, deep-fried falafel is well...deep-fried.  Hence began my quest to create an oven-baked version of falafel that was also toddler-friendly and healthy.  You can stuff these patties into pita bread with some pickled onions and tahini or just serve them plain with a little garlic yogurt sauce.   You can also make a big batch and freeze them.  My toddler loves these and I hope you enjoy them too!

Oven-Baked Veggie Falafel (Chickpea) Patties

2 15 oz can of chickpeas - drained

1/2 large red onion
4 cloves garlic
1/4 cup fresh parsley
1/4 cup cilantro
1 cup of fresh spinach and kale mix
2-3 tablespoons olive oil
4 tablespoons fresh lemon juice
2 teaspoons ground cumin
2 teaspoons ground coriander
salt and pepper
2 teaspoons baking powder
1/4 cup all-purpose flour 

Preheat oven to 400 degrees

Throw your chickpeas, onion, garlic, parsley, cilantro, spinach, kale, olive oil, lemon juice, cumin, coriander, salt, and pepper in your food processor.  So basically, everything except for the baking powder and flour.  I should have probably just said that....


Pulse it well so it looks like bright green hummus:


Add the baking powder and the flour and pulse once more, leaving the mixture chunky.  Transfer the mixture into a bowl.  You can either refrigerate the mixture at this point for up to 3 days or you can make it right away.  

Form the mixture into patties and lay gently on a olive oil-sprayed, foil-lined sheet. Mine yielded 12 patties but I made them pretty large.  


Bake for 12 minutes and then flip (VERY carefully) and bake another 12-15 minutes.  The outside should be slightly crispy but not dry, while the inside should be soft.  These will not have the same texture as fried falafels, but the taste is still amazing and it's significantly healthier!

Did I mention these are LOADED with protein and fiber? So if you have a toddler that has been having trouble, um...."letting things out", so to speak, I can assure you that these patties will do the trick.  Nothing like poop talk to get you in the mood to cook, am I right??  

Tuesday, May 3, 2016

Toddler-Friendly Asian Style Ground Turkey


Ah, Asian food.  There are days when I all want to do is shove my face into a bowl of spicy, greasy, MSG-filled General Tso chicken and even greasier noodles.  Don't forget the three limp pieces of snap peas and broccoli they throw in there for some greens.  Let's face it: Certain Asian takeout is not exactly the healthiest, and as a parent, you may be a little more hesitant to let Junior try the Kung Pao chicken. Make all the jokes you want about the mystery meat they might use, but I would rather pass on takeout if I can, especially as a meal option for my little one.  BUT...this food is so amazingly delicious! Not that deep fried chicken doused in some sweet orangey-ish looking sauce that attempts to pass as authentic, but true Asian food!

All those spices and flavors! Garlic, ginger, scallions, sweet, savory, spicy! I wanted to create a "base" sauce that you could apply to pretty much any meat (or tofu if you prefer).  In this recipe, I used ground turkey because it's a super lean, healthy meat and relatively inexpensive compared to grass fed beef.  I served my ground turkey over a bed of brown rice topped with some sesame seeds and scallions.  You can add some broccoli to the turkey while it simmers and have a complete meal with veggies.  I served this with green beans on the side, but the combinations are endless; you could do noodles, lettuce wraps, spring rolls.  This takes less than 30 minutes to make (unless you're making brown rice with it) and only tastes better the next day!


Asian Style Ground Turkey

Servings: Approx. 8-10

Ingredients:

2 lbs lean (93%) ground turkey

1/2 cup soy sauce, low sodium if preferred

1 tablespoon brown sugar or coconut palm sugar

1 tablespoon sesame oil

1/2 tsp crushed red pepper flakes, or double if you and the family can handle spice

4 garlic cloves

2 inch piece of fresh ginger (seriously one of the weirdest looking herbs I've ever seen)

3/4 cup minced red or white onion

Optional:

Green onions/scallions

Sesame Seeds

Brown Rice

Directions:

Get your base sauce ready: Combine the soy sauce, brown sugar, sesame oil, red pepper flakes, and 4 tbsp of water in a small bowl and mix well.  Set aside.


Heat a large, deep skillet on medium high heat.  While the skillet is heating up, peel the skin off your ginger, garlic, and onion.

Spray some non-stick spray on your skillet and add the turkey to the skillet and begin breaking it up and letting it cook.  While the turkey cooks, throw your ginger, garlic, and onion (or the Great Triumvirate of cooking ingredients, as I call it) into your chopper and give it a whirl.


Once the turkey has fully cooked, add your Great Triumvirate to the pan and cook for a couple of minutes. Add that magical sauce you put together in step one, (scrape the bottom for sugar) and mix well. Cover the skillet and let it simmer on medium low heat for around 15 minutes, then serve.


Usually, lean ground turkey turns out really dry but with the addition of the sauce in this recipe, it keeps it very moist and just soaks up the flavors amazingly well.  Ground beef would obviously be more flavorful, but can be fattier.  

Get out a bowl and add a cup (or two, who does one cup of rice??) and throw the turkey on top.  Add some sesame seeds and scallions and you are ready for some homemade Asian food goodness.  

Granted, serving this to a toddler who isn't able to use a spoon independently is a bit of a challenge. Especially one who has recently decided that being fed by her mother is the greatest affront to her toddlerhood and won't be tolerated for a minute.  This usually results in most of the food and five spoons on the floor, a VERY happy Border Collie, and a triumphant toddler who managed to get three pieces of turkey and two grains of rice in her mouth in 45 minutes.  

I hope you enjoy this recipe!! 


Thursday, April 21, 2016

Toddler-Friendly Salmon and Kale Patties with Avocado Crema Sauce


Let's talk fish for a second.  People seem to have a love/hate relationship with fish, especially "fishy-tasting fish" like salmon or trout.  There are also many folks highly allergic to certain types of fish, but that usually falls into the shellfish category.  For some reason, a lot of parents I've spoken to are terrified to give their babies or toddler any sort of seafood.  I would highly encourage parents to introduce seafood to their children early so they can acquire a taste for it. Countless studies have been done on the nutritional benefits of seafood and it is recommended to consume fish 2-3 times a week. Chock-full of vitamins, minerals, protein, low cholesterol, omega-3s, and not to mention the fact that consuming seafood regularly has proven to lower the risk of chronic diseases.  Phew.  Have I made my point that fish is really, really, really good for you?? I am not going to get into the wild-caught versus farm-raised and sustainable fish issues.  I buy wild-caught fish for my family but not everyone wants to fork out the extra $2-3 per pound on wild, organic fish.  I also make that fish last. If you're serving just a broiled 4 oz fillet for dinner, then that 1 lb of fish will not last for more than one meal for a family of 4.  However, if you get creative with your fish, you can stretch it out! One of my favorite ways to prepare salmon is to make salmon patties.  My husband waited three years to tell me that he doesn't actually like salmon a whole lot.  I had been making broiled salmon with the same marinade every week for three years.  I guess it took him three years to gather up the courage to tell me. Smart man, he knows how to survive.

Anyway, I decided to get creative and figure out a way to make that man eat salmon.  Enter salmon burgers.  He will wolf those down two at a time and I have to smack his hand away from getting more.  I was a bit nervous about how my daughter would react to salmon as far as taste but I decided to make her a salt-free version when she was ten months old and see how she did.  She LOVED it!  No allergic reactions to seafood either, which was a huge relief.  The great thing about these patties is that you can eat them as a low-carb option over a salad, stuff the patties into some pita bread for lunch, or eat them as burgers for dinner with some sweet potato fries.  There are countless possibilities on seasoning them so it is a glorious way to eat the fishy-tasting fish.  But aside from deep frying (SO unhealthy), how do you cook these things properly so they hold together? I have a great technique which I will show you below.  Please note that my ingredients will yield roughly 8-10 large patties because I am completely and 100% OK with leftovers and not having to cook dinner every day :)


Ingredients:

Patties:

2 lbs fresh salmon (Time-saving tip:  ask the seafood person to remove the skin for you.  This is SO much easier than attempting to skin the fillet when you get home).

1 cup of minced red onion

3 cups of kale

1 cup of whole wheat breadcrumbs

3 tsp of Old Bay Seasoning

Salt to taste

Avocado Crema Sauce: 

2 avocados

2 cloves of garlic

juice of 2-3 fresh limes

1/4 cup cilantro

Salt and pepper to taste 

Directions:

Heat a large non-stick pan on medium heat and when warm, add 2 tsp of olive oil

Use your chopper to mince your onion and keep that chopper handy for later

Add the red onions and saute for 3 mins until the onions begin to soften

Add the kale and continue to cook for another 4-5 mins until kale is completely wilted and the onions are cooked.

Remove the pan off the heat to let the veggies cool and start working on the salmon.  Keep the pan, you will need it later.

Back to your ol' faithful chopper we go.... (you know I love my Hamilton Beach one) and cut the RAW salmon into 2-3 inch pieces.  Try not to act like a sushi chef while cutting the raw salmon.  I do not speak from experience here or anything.  This process should be a piece of cake because you asked the nice person at the Seafood counter to skin the fish for you.  PLEASE TELL ME YOU DID THIS!

Throw the pieces of salmon into the food processor and give it whirl.  If you have a large food processor, you should be able to fit all 2 lbs of salmon into it without a problem but you may need to do a couple of batches if you have a smaller one.  I have found that raw salmon holds together and if you try and make these with fully cooked salmon or canned salmon, they will need a LOT of eggs and breadcrumbs to bind.  It should look like this when you've pulsed it for 15-20 seconds:


Add your kale and red onions into the chopper and run it one more time to mix all that good stuff into the salmon and to get the kale diced into teeny tiny pieces.


In a a large mixing bowl, add the one cup of breadcrumbs, Old Bay seasoning, salt, and salmon mixture, and mix very well.  The mixture will be oily from the natural fat from the salmon and it will be wet.  I only used one cup of breadcrumbs for 2 lbs of salmon because to me, it was enough to bind the salmon together and not too much that I felt overloaded with carbs.  

After a light spray of oil, get that large pan back on the heat and set it to medium.   You will not need to coat the pan with lots of oil because the salmon will release a lot of its natural good fat while it cooks. That will serve as enough oil for you to cook with.  It's like the salmon patties fry in their own fat--it's a truly beautiful thing to behold!

Form your patties and add them about four at a time to your hot pan.  Don't overcrowd the pan!


You will cook them for around 5 minutes on each side if you keep them on medium heat.  If you like them a bit more crispy, you can increase the heat to medium-high but only need around 3 mins. per side.  CAREFULLY flip the patties when it is time to change sides.  They should hold together really well but best to be safe.  If you have a meat thermometer, use it to make sure the internal temperature reads at least 145 degrees.  Since I started cooking for my toddler, I'm even more paranoid about under-cooking anything, especially seafood.  A meat thermometer ensures that you're not having to constantly cut into meat to check and see if it is done and prevents too much over cooking.  This is the one I use:

*

Get a paper towel-lined plate ready for when your patties are all cooked and golden-looking.


Now it is is time to prepare the SAUCE.  Oh the sauce.  I think I could just eat the sauce with a spoon and call it a day.  You obviously don't have to make the sauce but it is just SO delicious with these patties, especially in a burger form.  You can use this avocado crema sauce for just about any meat dish but I think it pairs magnificently with seafood.

Since you used your super duper chopper for raw seafood, please do not use it again for this sauce.  If you have another smaller chopper, whip that out.  I am a chopper collector/hoarder so I have many.  I HATE spending time dicing/mincing/slicing things so I hold my choppers dear to my heart.

Cut open those two avocados and slice them into small pieces

Open up 2 cloves of garlic

Throw the whole garlic cloves into the chopper first and proceed to mince.  Add your avocado pieces, the juice of 2 limes, and your cilantro, and run the chopper again until the sauce is smooth.  It should be thick but not have any visible chunks of avocado.  Add a bit of salt and pepper to taste and you may even want to add juice from another lime.  We're huge citrus fans in our house so it just depends on your tolerance.  Try not to eat the whole bowl of sauce before dinner. Remind yourself that the sauce is even more delicious the next day, and the next day.  The beautiful thing about adding fresh lime juice to the avocado sauce is that it prevents the avocados from browning.  Win-Win!


If you're serving the patties low-carb, I would recommend putting a patty on a bed of mixed greens or arugula and adding a dollop (or five) of the avocado crema sauce.  We ate ours as burgers with whole wheat buns and sweet potato fries.  The 2 lbs of salmon should have yielded around 8-10 patties which can feed a family of four for two dinners.  I spent around $27 on my salmon because I bought the E.U. certified organic, blah blah, blah salmon and it has lasted the three of us three dinners since I yielded 9 patties.  My toddler eats a whole patty herself, she loves these so much.  Plus, there's kale in them so I feel like it is one of those super foods and feel so good when she eats this meal! These patties reheat very well in the microwave and freeze perfectly too!  Bon Appetit!